

Kimono Accessories Guide: Essential Tools for Comfortable, Beautiful Kimono Dressing
Wearing a traditional Japanese kimono involves meticulous layering and precise coordination, yet most of that work happens beneath the surface. Proper kimono dressing, known as kitsuke, depends less on the kimono itself and more on the accessories that shape, secure, and smooth every layer into place. A simplified kimono outfit can require more than ten individual accessory components, and that number climbs for formal occasions. This guide breaks down every piece so you know exactly what to buy, what to skip, and how the whole thing comes together.
Introduction: Why Kimono Accessories Matter in Kimono Dressing
The core goal of wearing kimono is creating a smooth, cylindrical silhouette rather than a body-hugging shape. In Japanese culture, this tubular form is considered elegant because it allows the fabric's pattern, color, and drape to take center stage instead of emphasizing the figure beneath. Both women's kimono and men's kimono rely on discreet tools - ties, padding, under-layers, stiffeners, and obi accessories - to achieve this appearance.
Kimono accessories are essential for securing the garment and establishing the formality of any outfit. Many of these items are lightweight, affordable, and reusable for years. Modern substitutes like small towels for padding work perfectly until you build a complete kitsuke set. Below, you will find every accessory separated into "must-have" and "nice-to-have" categories so beginners can dress with confidence from day one.
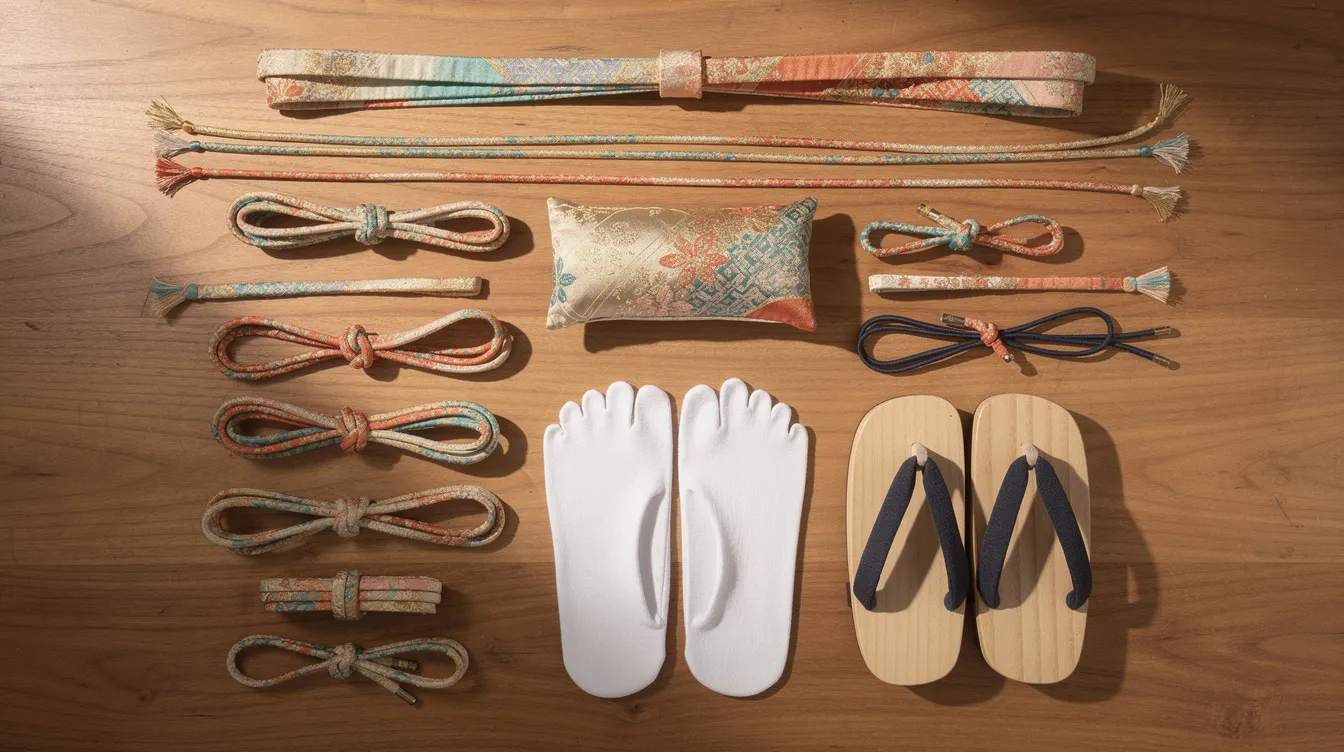
Essential Checklist: What You Need to Wear a Kimono
Before diving into details, here is a scannable checklist grouped by function. Not every item is required for casual wear - the notes below each group clarify what you can skip.
Base layers:
-
Sports bra or minimizer (women), smooth underpants
-
Hadajuban (skin-layer undergarment) and susoyoke (petticoat)
-
Nagajuban (under-kimono) with eri-shin (collar stiffener)
Structural tools:
-
2–3 koshihimo (waist ties)
-
1–2 datejime (smoothing belts)
-
Hosei padding or thin towels
-
Korin belt (optional, great for beginners)
Obi accessories:
-
Obi-ita (obi board)
-
Obi-makura (pillow) and obiage (silk sash)
-
Obijime (decorative cord), plus optional sanbun-himo with obidome
Footwear:
-
White cotton tabi socks
-
Zori (formal) or geta (casual)
For casual yukata dressing, you can skip the nagajuban, obi-makura, obiage, and sometimes the obi-ita entirely.
Obi accessories include obiita, obi-makura, and obi-jime - these three form the structural backbone of any finished obi style.
Base Layer 1: Hadajuban – The Skin-Layer Undergarment
The hadajuban is the closest layer to the skin, worn by both women and men to absorb sweat and protect expensive outer garments. You can also think of it as a hadagi - a lightweight shirt worn directly against the skin for hygiene. Without it, sweat acids break down silk fibers over time and force costly dry-cleaning.
Common fabrics include cotton and cotton blends chosen for breathability, which matters enormously in humid Japanese summers. Two shapes exist: a separate top paired with a susoyoke (a straight petticoat worn under the kimono to protect the lower body), or a one-piece slip style. The two-piece version gives you more control when adjusting length around the legs.
For absolute beginners, a plain cotton T-shirt with a wide neck and a simple half-slip can work at the practice stage - though dedicated kitsuke pieces deliver a smoother silhouette. Choose nude or white colors to avoid show-through under pale or formal kimono fabric.
Base Layer 2: Nagajuban and Eri-shin – Shaping the Silhouette and Collar
The nagajuban is the under-kimono worn over the hadajuban. It is essential for protecting the kimono and adds elegance through its decorative collar and sleeve edges, which peek out during wear. This layer creates the smooth foundation that lets the outer kimono hang without revealing structural irregularities.
Women's kimono nagajuban are cut with longer sleeves to match the outer garment, while men's kimono versions are simpler and narrower. Both should be slightly shorter than the outer kimono in length. For daily practice, easy-care polyester works well; for formal events, silk is the standard.
The erishin is a rigid piece inserted into the collar of the juban - typically a flexible plastic or stiffened washi strip about 4.3 × 81 cm. It keeps the collar of the nagajuban stiff, creating the crisp, slightly curved neckline at the back of the neck that defines refined kimono dressing. Beginners often underestimate how much this single strip affects the final appearance, especially for formal occasions like weddings or Coming-of-Age Day. Remove the eri-shin before folding the nagajuban for storage to prevent permanent creasing.
Creating the Cylindrical Silhouette: Hosei and Padding
Traditional kimono dressing aims to flatten body curves and create a straight, column-like silhouette so fabric drapes evenly from shoulders to hem. Hosei refers to both the process and the tools - pads, folded towels, gauze wraps - used to even out curves at the chest, waist, and hips.
For women's kimono, the common practice is to reduce bust projection with a soft bra, then fill the waist with towels or ready-made pads until the torso resembles a cylinder. Men's kimono usually need less padding, but slim people may still benefit from a small towel at the waist to stabilize the obi line.
Low-cost substitutes work perfectly: thin hand towels, gauze strips, or fleece wrapped around the midsection. The key is balance - over-padding creates bulk and discomfort, while skipping hosei entirely leads to gaping collars, twisted hems, and a sagging obi later in the day. Gather your padding materials before you begin putting on any layer to keep the whole process efficient.
Koshihimo: The Simple Ties That Hold Everything Together
Koshihimo is a thin fabric belt used to secure the kimono at every stage of dressing. These soft, narrow cloth ties - typically cotton or rayon, about 100–120 cm long and 4–5 cm in width - hold the nagajuban and outer kimono in place while you adjust length and collar alignment.
A beginner should have at least two, ideally three, for standard women's kimono dressing. Men's kimono generally need only one or two. Here is where each tie is placed:
-
First tie: Under the chest to secure the nagajuban
-
Second tie: At waist or hip level to set kimono length and create the ohashori fold
-
Third tie (or korin belt): To fix the collar cross at the right angle
Tie the koshi-himo over your belly button to secure the kimono - this is the standard anchor point. Slightly textured cotton ties prevent slipping while remaining gentle on fabric. Avoid elastic or very narrow ribbons, which can dig into the body and distort the silhouette. A practical tip: mark the center of each tie with a small stitch so you can align it quickly during donning.
Datejime: Smoothing Belts for Stable Collars and Waist
The datejime is an inner belt used to secure the kimono layers and smooth everything beneath the obi. Wider and flatter than koshihimo, it sits over the ties to prevent wrinkles from forming under the obi.
Two types exist: soft fabric versions (cotton or satin) for gentle hold, and elastic or foam-lined versions for extra structure. Standard placement uses one datejime over the nagajuban collar area to keep the collar from shifting, and another over the kimono waistline before you tie the obi. This two-belt approach is especially important for formal women's kimono, where even a small wrinkle at the waist can spoil the clean edge of the obi front.
Men's kimono often use a single datejime, since their obi is narrower and less complex. Choose white or pale colors so the belt does not show through light outer fabrics.
Korin Belt: Beginner-Friendly Helper for Neat Collars
The korin belt is an elastic belt with clips at both ends, designed to hold the kimono or nagajuban collar in place without adding bulky knots. It is especially helpful for beginners who dress alone - it keeps the left-over-right collar alignment neat while your hands are busy adjusting the waist fold and excess material.
Attach one clip to the right side collar edge, route the belt under the arm or across the back, and clip the other end to the left side. A korin belt can sometimes replace a third koshihimo, making the front smoother and more comfortable.
It is optional but highly recommended for self-dressers practicing kitsuke at home. Some purists prefer using only koshihimo and personal taste, but modern dressers widely appreciate the convenience and stability this tool provides.
Obi-Ita: Keeping the Obi Front Flat and Elegant
The obi-ita is a thin, semi-rigid board placed at the front of the body under the obi. The obiita prevents creases under the obi, keeping the front panel smooth and polished. Materials range from flexible plastic to stiffened fabric with a cardboard core.
Two common types:
-
Separate insert plates - lightweight, easy to position, removable
-
Wrap-around belt style - covers front and sides, more stable but bulkier
For formal events, a crisp obi front is non-negotiable. Light, flexible versions are easiest for beginners to position when tying the obi alone. Soft-edged boards prevent digging into the ribs during long ceremonies.
Casual hanhaba-obi is a narrow, informal belt that can often be worn without an obi-ita, which simplifies the dressing process considerably for yukata and relaxed outfits.
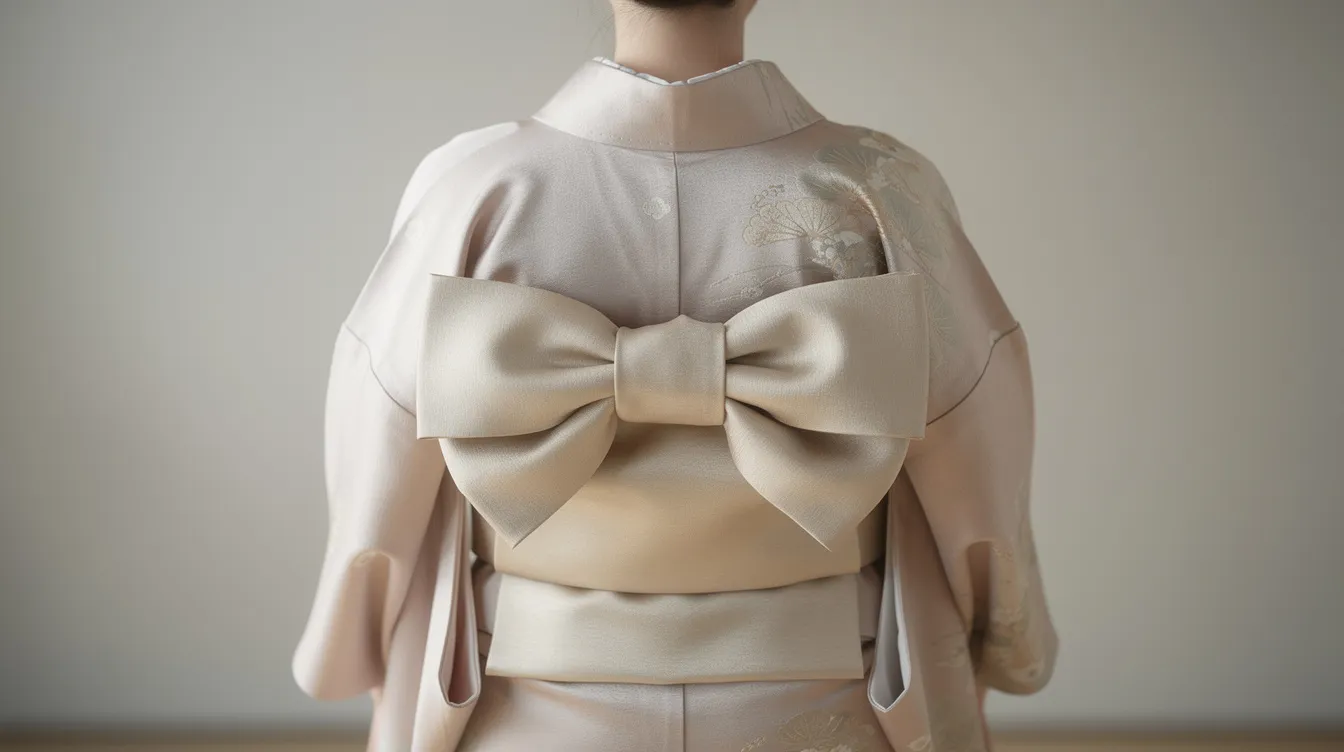
Obi Makura & Obiage: Building and Supporting Obi Knots
The obi-makura is a small padded pillow used mainly for creating raised obi knots such as the classic taiko musubi. It sits at the back under the upper fold of the obi, providing the volume and shape that keeps the knot from collapsing. Tying the obi requires specific accessories for structure, and the obi-makura is the primary one.
The obiage is a silk cloth tucked above the obi that supports the knot and adds color. It wraps over the makura, with its ends tied and tucked into the obi at the front. Together, these two accessories frame the back of the outfit and add a moment of visual contrast.
Different types of obi correspond to different levels of formality. Nagoya obi and fukuro obi usually require both obi-makura and obiage. Casual hanhaba obi generally does not need an obi-makura or obiage, which is exactly why hanhaba styles are recommended for beginners. The obi is the finishing touch to the kimono ensemble, and the right accessories make it hold its shape all day. Men's kimono obi styles are flatter and rarely use an obi-makura.
Obijime & Obidome: Decorative Cords That Lock the Obi in Place
Obijime is a decorative cord tied over the obi to secure its shape and add style. Made from braided silk or rayon, it wraps around the center of the obi and ties at the front, preventing the knot from loosening throughout the day. Obijime colors can coordinate with or contrast against the kimono and obiage - seasonal motifs significantly influence accessory choices in kimono styling, so many dressers rotate cords by season.
Obidome is a decorative piece worn on the obijime similar to a brooch, threaded onto the cord at the front for added flair. A sanbun-himo is a slimmer version of an obijime designed specifically to pass through small obidome openings, making decorative styling easier. For more detail on this pairing, look for a dedicated sanbun-himo guide.
While obijime are essential for most women's formal outfits, men's kimono usually use a simpler, flatter cord without obidome. Beginners should start with one versatile obijime in a neutral or soft color, then add seasonal or themed obidome clips as they gain confidence.
Tabi & Traditional Footwear: Zori vs. Geta
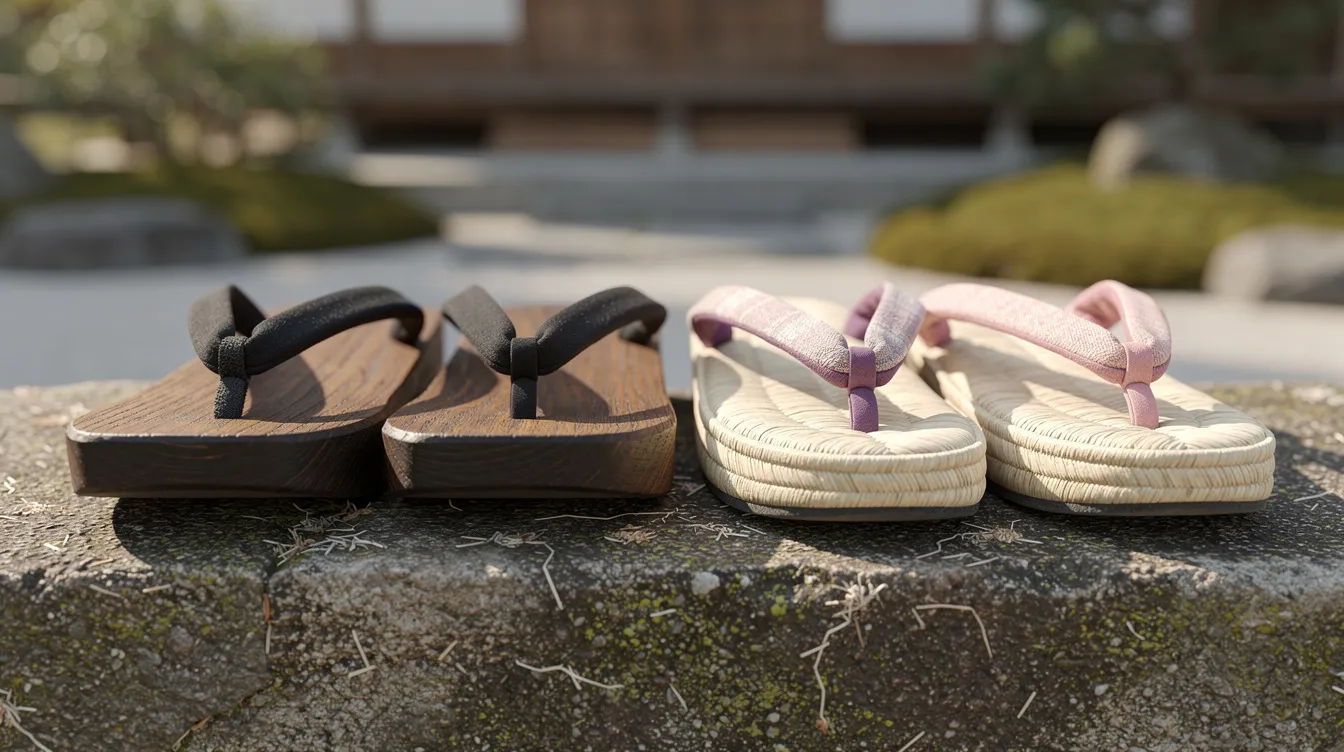
Socks and sandals complete the traditional look, whether for tea ceremony, festivals, or formal events. Tabi are traditional split-toe socks designed for wearing with sandals like zori and geta. White cotton tabi fastened with four or five metal clasps (kohaze) are standard for formal occasions. Colored or patterned tabi suit casual clothes and relaxed outfits.
Zori are formal sandals with fabric or brocade straps and slightly raised soles, suited to events like weddings and graduation ceremonies. Traditional geta sandals are made of raised wood, typically worn with yukata or very casual kimono at summer festivals. Men's kimono usually pair with broader, less elevated zori or geta in subdued colors like black, brown, or navy.
Fit matters: heels should not hang excessively off the back, and straps should feel snug but not painfully tight across the feet. Bags often match sandals for formal kimono events, and kanzashi - decorative hairpins and ornaments - are used to enhance traditional hairstyles. Hairpins and combs are essential accessories for kimono outfits, especially for girls and women wearing furisode with long sleeves.
Step-by-Step Overview: How to Wear a Kimono with These Accessories
This is a quick roadmap, not a full tutorial. Use it to see how every accessory fits into the dressing stage.
-
Tabi and undergarments first. Put on tabi, sports bra (or minimizer), and briefs before anything else - bending down later is difficult in a wrapped kimono.
-
Hadajuban and hosei. Slip on the hadajuban and susoyoke. Wrap towels or padding around the waist to create a cylindrical body shape.
-
Nagajuban. Pull on the nagajuban, insert the eri-shin, and always cross the left side of the kimono over the right. Secure with a koshihimo and smooth with a datejime.
-
Outer kimono. Drape the kimono over your shoulders, adjust the hem length at your ankles, cross left over right again, and secure with one or two koshihimo. Use a korin belt or a third tie to hold the collar with your right hand while you tuck excess material with your left hand.
-
Second datejime. Wrap a datejime around the kimono waist to smooth everything before the obi.
-
Obi. Tie your obi - hanhaba, nagoya, or other style - inserting the obi-ita at the front. For taiko musubi, place the obi-makura, cover with obiage, and finish by tying the obijime.
-
Final check. Adjust your appearance in a mirror: straight side lines, tidy V-shaped collar at the back of the neck, obi sitting horizontally and firmly, and arms free to move comfortably.
Casual Yukata vs. Formal Kimono: Accessory Differences
Many beginners start with a casual yukata because it requires far fewer layers and accessories than a lined, formal kimono. This is committed, practical advice - learning the basic rhythms of kimono dressing on a lightweight cotton robe builds muscle memory before you invest in silk.
|
Feature |
Yukata |
Formal Kimono |
|---|---|---|
|
Nagajuban |
Usually skipped |
Required |
|
Koshihimo |
1–2 |
2–3 |
|
Datejime |
Optional (1 soft) |
1–2 |
|
Obi type |
Hanhaba obi |
Nagoya or fukuro obi |
|
Obi-makura & obiage |
Not needed |
Required for taiko musubi |
|
Footwear |
Geta, often barefoot |
Zori with white tabi |
Pairing accessories depends on the occasion and involves matching the formality of the kimono. Formal occasions usually require finely coordinated accessories that maintain an elegant appearance. Yukata are unlined cotton robes for summer festivals and hot springs; formal kimono use silk and are worn for ceremonies. A haori - a lightweight kimono jacket - can be worn over either for warmth or added style. For a deeper comparison, look for a dedicated yukata vs kimono guide.
Building Your First Kimono Accessory Set: Practical Shopping Tips
You do not need everything at once. Here is a minimalist starter kit at regular price points:
-
2–3 koshihimo (cotton)
-
1–2 datejime
-
1 obi-ita
-
1 hadajuban + susoyoke
-
1 easy-care polyester nagajuban with eri-shin
-
1 hanhaba obi for practice
Prioritize comfortable, washable fabrics - polyester nagajuban, cotton hadajuban - before investing in high-end silk. Pre-made kitsuke sets that bundle essentials are widely available, but check that the nagajuban length and obi width match your height and hip measurements.
When choosing your first obi, hanhaba obi is the clear winner for first-time self-dressers: it is forgiving, inexpensive, and requires fewer supporting tools than a nagoya obi. For a detailed comparison, see the hanhaba obi vs nagoya obi guide.
Once you are comfortable with basic dress and fold techniques, add decorative pieces over time - obijime in seasonal colors, sanbun-himo with obidome clips, and matching hair accessories. The elegance of kimono dressing grows with each new piece you learn to use, and the event possibilities expand with your collection. Start with a yukata and a handful of ties, and build from there. The whole thing becomes second nature faster than you would expect.